Circular Bullseye
Table of Contents:
- 1. Deadline
- 2. Problem Statement
- 3. Testing
- 4. Submission Guidelines
- 5. Debugging Tips
- 5. Allowed and Disallowed functions
- 6. Collaboration Policy
1. Deadline
11:59PM, Tuesday, October 29, 2019 for submission of the report and video.
2. Problem Statement
In this project, your aim is to find a circular bullseye and land on it. You are given the approximate co-ordinates (as a Gaussian distribution) of the bullseye from your starting point. The circular bullseye is setup in the lab IRB 0108. You need to collect data as a ROS bag/video capture while moving the monocular + stereo camera is pointed at different angles (possible different illumination) of the circular bullseye.
3. Testing
On the day of the deadline, each team will be given a 15 minute slot for demoing their code in action to the instructors. The instructors will place the circular bullseye as they wish (position with gaussian given). The task is to land on the circular target.
4. Submission Guidelines
If your submission does not comply with the following guidelines, you’ll be given ZERO credit
4.1. Report
Explain in detail your approach to complete the project, and describe any interesting problems you encountered and/or solutions you implemented. You MUST include the following details in your writeup:
- Your report MUST be typeset in LaTeX in the IEEE Tran format provided to you in the
Draftfolder (Use the same draft folder from P1) and should of a conference quality paper. - Present Vicon plots for each trajectory followed along with the estimated 3D bullseye center position overlaid on the same plot. (Show all three views
X-Y,X-ZandY-Z). - Present the output videos for trajectory following along with the 3D bullseye center position estimates in real-time as
Outputs/Bullseye.mp4.
4.2. File tree and naming
Your submission on ELMS/Canvas must be a zip file, following the naming convention TeamYourTeamNumber_p3b.zip. If you email ID is 1, then the submission file should be named Team1_p3b.zip. You can have any helper functions in sub-folders as you wish, be sure to index them using relative paths and if you have command line arguments for your Wrapper codes, make sure to have default values too. Please provide detailed instructions on how to run your code in README.md file. Please DO NOT include data in your submission.
TeamYourTeamNumber_p3a.zip
│   README.md
|   Your Code files
|   ├── Any subfolders you want along with files
|   Outputs
|   └──  Bullseye.mp4
└── Report.pdf
5. Debugging Tips
- To verify if your detections are working correctly, plot the corners of the window on the image, they should align with the true window corners.
- To verify if your pose estimation is correct, re-project the estimated 3D corners of the window onto the image. They should be very close to the detected corners.
5. Allowed and Disallowed functions
Allowed:
Any functions regarding reading, writing and displaying/plotting images and windows in cv2, matplotlib, ROS.
- Basic math utilities including convolution operations in
numpyandmath. - Any functions for pretty plots.
bebop_autonomypackages for controlling the PRGHusky.
Disallowed:
- Any function that implements trajectory interpolation.
- Any function that directly detects the window.
- Functions for contour fitting.
6. Collaboration Policy
You are encouraged to discuss the ideas with your peers. However, the code should be your own team’s, and should be the result of you exercising your own understanding of it. If you reference anyone else’s code in writing your project, you must properly cite it in your code (in comments) and your writeup. For the full honor code refer to the ENAE788M Fall 2019 website. ======= — layout: page mathjax: true title: Circular Bullseye permalink: /2019/proj/p3b/ —
Table of Contents:
- 1. Deadline
- 2. Problem Statement
- 3. Implementation
- 4. Testing
- 5. Submission Guidelines
- 6. Debugging Tips
- 7. Allowed and Disallowed functions
- 8. Hardware Tips
- 9. Collaboration Policy
1. Deadline
11:59PM, Tuesday, October 29, 2019 for submission of the report and video.
2. Problem Statement
In this project, your aim is to find a circular bullseye and land on it. You are given the approximate co-ordinates (as a Gaussian distribution) of the bullseye from your starting point. The circular bullseye is setup in the lab IRB 0108. You need to collect data as a ROS bag/video capture while moving the monocular + stereo camera(s) (you are allowed to use any/all of the cameras) is pointed at different angles (possible different illumination) of the circular bullseye.
3. Implementation
The instructors will place the circular bullseye as they wish (position with gaussian given). The task is to land on the circular target. You’ll need to implement the following:
3.1. ROS Nodes
You need to create multiple ROS nodes to run your algorithm: one for vision, another for the control or one which does both. You can have any number of nodes as you desire.
3.2. Launch File
All the above ROS nodes must be called using a single launch file.
3.3. Rviz visualization
You are required to plot the circular bull’s eye image on the ground (you can assume the center of the tag as the world frame origin) in rviz and plot you the PRG Husky pose relative to the tag using rviz tf like you did in the previous projects. A sample video for an april tag is shown here. Feel free to use the display code base from here and modify it to meet your needs.
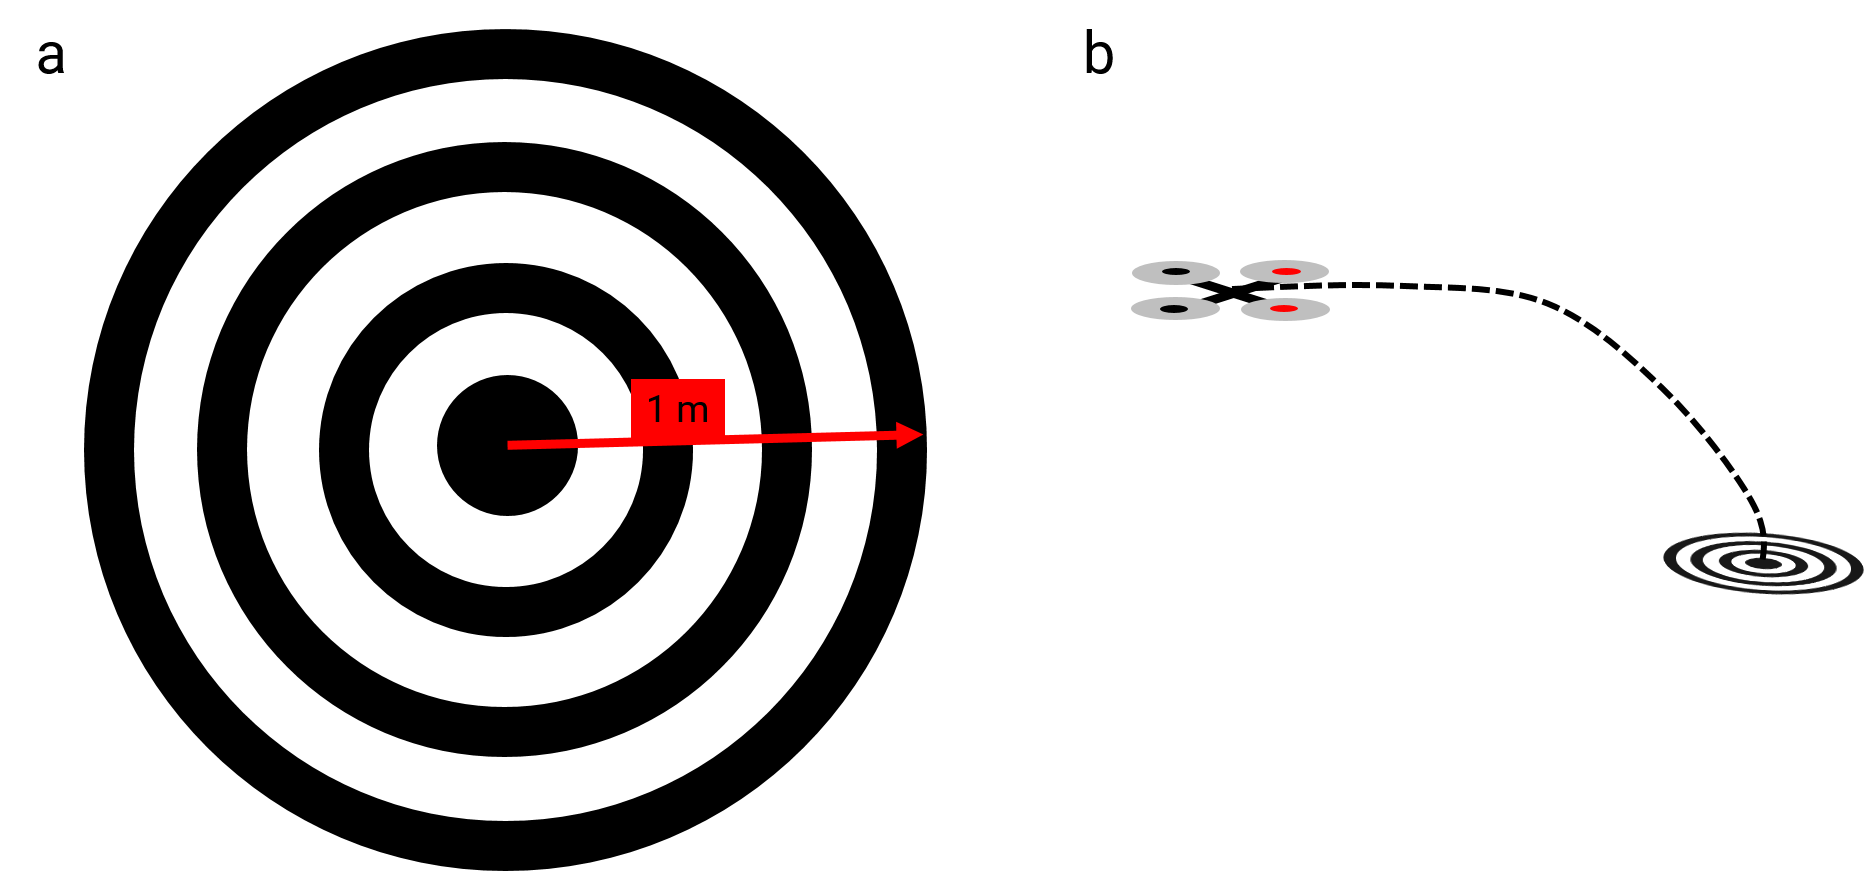
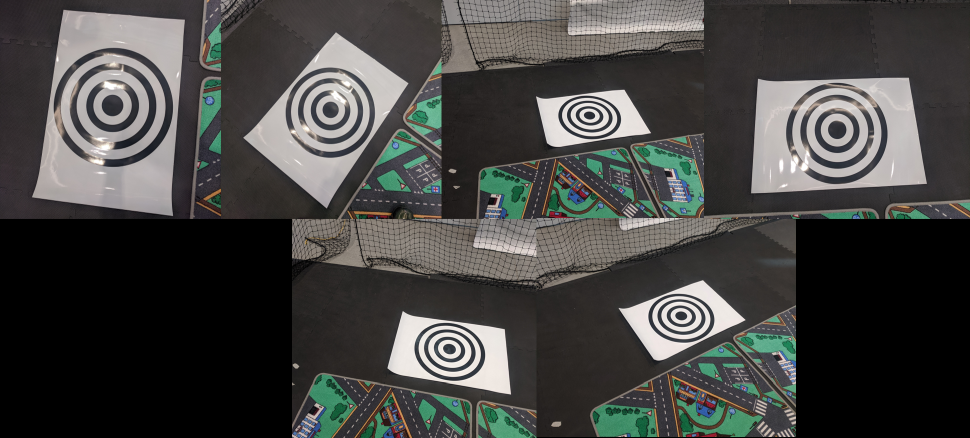
3.4. Tag Detection
Detect the tag using any binarization method (thresholding), knowing that the tag is black on a white background. The tag is made of a filled circle in the center and 3 concentric thick rings around it all filled in black. To enable easy detection the tags have a white border around them. The tag from different viewpoints is shown in Fig. 2. Notice that the tag is glossy and has reflections. We recommend that you print the tag on A4 paper for your testing (make sure to not scale in an uneven fashion) so that the actual tag which you’ll be testing on remains pristine.
3.5. Ellipse Fitting
Once the tag candidates have been detected, you should robustify your results by throwing out false detections. You can use any ellipse fitting method to do this.
3.6. Tag Pose
Once the tag has been detected, you’ll need to recover the camera pose with respect to the tag. Here we assume that the tag is fixed and the camera is moving, hence the tag is in some known co-ordinates in an arbitrarily chosen world frame. The choice of the world frame could be as simple as the center of the tag as origin. Implement your own function or method to recover camera pose from the tag detection. Be sure to explain in detail with equations how you do this step in your report.
4. Testing
On the day of the deadline, each team will be given a 10 minute slot for demoing their code in action to the instructors.
Specifically, the team will place their PRG Husky at the corner of the flying space and then the instructors will place the circular bull’s eye tag at relative to the PRG Husky initial position with a covariance . Your task is to take off, adjust your position according to the position of tag and then land on the tag.
The tag is glossy and the camera will suffer from glares and reflection. So, your algorithm has to take into that account.
5. Submission Guidelines
If your submission does not comply with the following guidelines, you’ll be given ZERO credit
5.1. Report
Explain in detail your approach to complete the project, and describe any interesting problems you encountered and/or solutions you implemented. You MUST include the following details in your writeup:
- Your report MUST be typeset in LaTeX in the IEEE Tran format provided to you in the
Draftfolder (Use the same draft folder from P1) and should of a conference quality paper. - Present the output videos for trajectory following along with the 3D bullseye center position estimates in real-time as
Outputs/Bullseye.mp4. - Tag detection (plotted on the image plane) in every frame as seen from Duo camera:
Bullseye-duo.mp4. You can use any one or both the downfacing camera(s) from DUO. - Tag detection (3D pose) plotted in
rviz:Bullseye-rviz.mp4. You are required to plot the circular bull’s eye image on the ground (you can assume the center of the tag as the world frame origin) inrvizand plot you the PRG Husky pose relative to the tag using rviz tf like you did in the previous projects. A sample video for an april tag is shown here. Feel free to use the display code base from here and modify it to meet your needs.
5.2. File tree and naming
Your submission on ELMS/Canvas must be a zip file, following the naming convention TeamYourTeamNumber_p3b.zip. If you email ID is 1, then the submission file should be named Team1_p3b.zip. You can have any helper functions in sub-folders as you wish, be sure to index them using relative paths and if you have command line arguments for your Wrapper codes, make sure to have default values too. Please provide detailed instructions on how to run your code in README.md file. Please DO NOT include data in your submission.
TeamYourTeamNumber_p3a.zip
│   README.md
|   Your Code files
|   ├── Any subfolders you want along with files
|   Outputs
|   ├──  Bullseye-duo.mp4
|   ├──  Bullseye-rviz.mp
|   └──  Bullseye.mp4
└── Report.pdf
6. Debugging Tips
- To verify if your detections are working correctly, plot the circles/ellipses detected or pose of the tag on the image.
7. Allowed and Disallowed functions
Allowed:
Any functions regarding reading, writing and displaying/plotting images and windows in cv2, matplotlib, ROS.
- Basic math utilities including convolution operations in
numpyandmath. - Any functions for pretty plots.
bebop_autonomypackages for controlling the PRGHusky.- Hough Circles and
cv2.fitellipseor any other function for contour fitting.
Disallowed:
- Any function that directly estimates the pose of the ellipse in 3D.
8. Hardware Tips
8.1. Duo3D Camera Driver
Follow the steps from this repo to install the Duo3D camera driver.
8.2. Camera Calibration
The Duo3D camera comes calibrated out of the factory and gives only the calibrated images. To calibrate the extrinsics between the Duo3D stereo camera and front facing leopard imaging camera use the Kalibr package from ETH-Z and calibrate using the IMU from the Duo and the front camera since there is no common field of view between the two cameras to calibrate them directly.
9. Collaboration Policy
You are encouraged to discuss the ideas with your peers. However, the code should be your own team’s, and should be the result of you exercising your own understanding of it. If you reference anyone else’s code in writing your project, you must properly cite it in your code (in comments) and your writeup. For the full honor code refer to the ENAE788M Fall 2019 website.
9f08380f2d3b9e99fe3bdf0dc4a60254760c12b5