Avoid the wall and find the bridge
Table of Contents:
- 1. Deadline
- 2. Problem Statement
- 3. Implementation
- 4. Submission Guidelines
- 5. Debugging Tips
- 6. Allowed and Disallowed functions
- 7. Live Demo
- 8. Hardware Tips
- 9. Collaboration Policy
1. Deadline
11:59PM, Thursday, November 21, 2019 for report/video submission.
2. Problem Statement
In this project, you have two tasks:
Task 1: You need your quadrotor to cross over the bridge while avoiding the river.
Task 2: Detect the wall infront of your quadrotor and go through above or below the wall, depending on the height of the wall.
Let’s understand the problem statement in depth.
Your PRG Husky platform is equipped with a front facing RGB camera, a down facing stereo grayscale camera and an IMU. For the first task, you are in a space with a thin river-like band of blue sheet on the floor. Only a small region has a ladder/bridge on the top of the river. Your aim is to avoid the blue river and cross it above the bridge. But there’s a catch, your bottom facing camera is grayscale. You need to detect textures/grayscale value of the river in order to avoid it. Or you can simply detect where the bridge is and go above it. Refer Figs. 1 and 2.


For your second task, you are given a wall of unknown length and breadth which is placed at a some unknown distance infront of the PRG Husky. You are going to do some version of odometry/PnP to estimate the distance and position of the wall in some arbitrary units. Optionally, to get it to metric scale, use the down-facing camera estimates which are in absolute or metric scale. Once you have estimated the position and the distance of the wall with respect to PRG Husky, your task is to go above or below depending on the position of the wall. Refer Figs. 3 and 4 for the two possible cases that you will encounter.

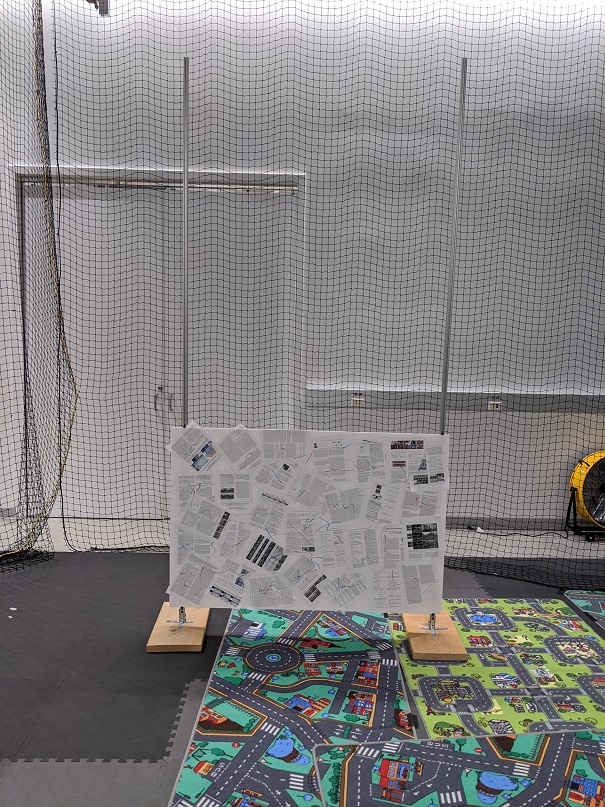
Note that you cannot go left or right of the metal bars. You are restricted to a height of 2.5 meters for this project. If you fly above 2.5m in any of the two tasks mentioned above, your task will be counted as unsuccessful. Also, the wall is equiped with a lot of visual features so you can detect it easily.
You can collect data as a ROS bag/video from the downfacing and frontfacing cameras of the river-bridge scene and the wall in IRB lab 0108. Feel free to change the illumination of the room. Define the coordinates as as the starting pose (the first frame).
3. Implementation
This project it totally open! You can use any open-source code available online to solve any part of the problem. Make sure you cite them. You can also learn the textures on the floor to distinguish between the river and the bridge. A sample texture is available in the lab.
For estimating the metric depth (and relative pose) of the wall from front facing camera in absolute scale, you need odometry estimates from the bottom facing camera. Using Kalibr, calibrate the bottom facing camera with IMU; calibrate front facing camera with IMU and get the relative transformation (Rotation and Translation or extrinsics) between front facing camera and bottom facing camera. Now, both cameras are running a version odometry estimation. Use the extrinsic calibration to provide a metric scale for the front facing camera. Make sure your data is time syncronized before running through the Kalibr. You can use TimeSynchronizer for this.
For the bottom facing camera depth estimation, you can use your results from Project 4a or any online open-source code.
YOU CAN ALSO USE THE HEIGHT MEASUREMENT OF THE SONAR AND ODOMETRY FROM bebop_autonomy!
3.1. ROS Nodes
You need to create one or multiple ROS node(s) to run your algorithm for each task. You have to publish trajectory for both tasks as nav_msgs/Odometry (accumulated instantaneous camera pose).
3.2. Launch File
All the above ROS node(s) must be called using a single launch file.
3.3. Rviz visualization
You are required to plot your estimated 3D camera pose in rviz along with the odometry (nav_msgs/Odometry) from the PRG Husky using rviz tf like you did in the previous projects.
For Task 2, you need to plot the wall in rviz along with the trajectory (and pose i.e. both position and orientation) of your quadrotor. This visualization is similar to what you did in Project 3b (Mini Drone Race). Be sure to fix your wall in some arbitrarily chosen world frame and plot your camera’s (quadrotor’s) pose with respect to it.
3.4 Camera Calibration
Camera Intrinsic and Extrinsic calibration entails with estimating the camera calibration matrix K which includes the focal length and the principal point and the distortion parameters and relative rotation and translation ( and ) between a set of sensors. You’ll need to use the awesome calibration package developed by ETHZ Kalibr to do this. You’ll need either a checkerboard or an april grid to calibrate the camera. We found that using the April grid gave us superior results. Feel free to print one (don’t forget to turn off autoscaling or scaling of any sort before printing). Bigger april grids or checkerboard in general give more accurate results. A large april grid is located in IRB 3237 (Fig. 4) which you are free to use if you don’t want to print your own.
4. Submission Guidelines
If your submission does not comply with the following guidelines, you’ll be given ZERO credit.
4.1. Report
Explain in detail your approach to complete the project, and describe any interesting problems you encountered and/or solutions you implemented. You MUST include the following details in your writeup:
- Your report MUST be typeset in LaTeX in the IEEE Tran format provided to you in the
Draftfolder (Use the same draft folder from P1) and should of a conference quality paper. - Present the output videos for your estimated trajectory while going above the bridge and stereo (both left and right) frames as
Outputs/Task1.mp4. - Present the output videos for trajectory following along with the wall detection overlaid on the video, rviz visualization of 3D wall pose estimates in real-time as
Outputs/Task2.mp4for Task 2.
4.2. File tree and naming
Your submission on ELMS/Canvas must be a zip file, following the naming convention TeamYourTeamNumber_p4b.zip. If you email ID is 1, then the submission file should be named Team1_p4b.zip. You can have any helper functions in sub-folders as you wish, be sure to index them using relative paths and if you have command line arguments for your Wrapper codes, make sure to have default values too. Please provide detailed instructions on how to run your code in README.md file. Please DO NOT include data in your submission zip file.
TeamYourTeamNumber_p4a.zip
│   README.md
|   Your Code files
|   ├── Any subfolders you want along with files
|   Outputs
|   ├── Task1.mp4
|   └── Task2.mp4
└── Report.pdf
5. Debugging Tips
- To verify if your extrinsic calibration is correct, measure the translation between the sensors using a standard ruler. If it is far from calibrated translation, you definitely have done something wrong with your calibration.
6. Allowed and Disallowed functions
Allowed:
Any functions regarding reading, writing and displaying/plotting images and windows in cv2, matplotlib, ROS.
- Basic math utilities including convolution operations in
numpyandmath. - Any functions for pretty plots.
bebop_autonomypackages for controlling the PRGHusky.- Any function that computes features/corners.
- Any function that matches feature correspondences.
- Any function that performs KLT or any other feature tracker.
- Any function that computes sparse or dense optical flow.
- Any function that computes RANSAC. Although, you can use any least square solver.
- Any function that fits a plane.
- Any function that solves entire structure from motion.
Disallowed:
- NOTHING!
7. Live Demo
On the day of the deadline, each team will be given a 15 minute slot for demonstrating their code in action to the instructors. For Task 2, the instructors will place the quadrotor such that the river-bridge scene is in the front facing camera direction (or infront of the PRG Husky). Note that you will NOT be able to see the bridge from the front facing camera once you take-off from ground. You need to go above the bridge to solve Task 2. If more than 50% of the PRG Husky volume is above the bridge, it will be counted as success.
For Task 1, the instructors will place the wall (at arbitrary height) as well as the PRG Husky quadrotor as they wish (position, orientation). The instructors will make sure that atleast a major part of the wall is in the visible region as seen from the first frame (note that it is not guarenteed that the complete window will be visible in the first frame). The task is the fly above or below the window as fast as possible. You also need to show us a live visualization of your detection (corners of the window overlaid on the image) along with the 3D visualization of the window with the relative camera pose overlaid in rviz. If you don’t go between the two metal bars, or go above 2.5m in altitude, it will be counted as a failure.
You can have ANY number of trials in 15 mins for both combined. Only the best trial will be graded.
THE ENTIRE AREA WILL HAVE FEATURES (CARPETS)!!
LIVE DEMO TIMINGS WILL BE RELEASED LATER.
8. Hardware Tips
8.1. Duo3D Camera Driver
Follow the steps from this repo to install the Duo3D camera driver.
8.2. Camera Calibration
The Duo3D camera comes calibrated out of the factory and gives only the calibrated images. You can also use the Kalibr package from ETH-Z to re-calibrate the duo cameras if needed.
9. Collaboration Policy
You are encouraged to discuss the ideas with your peers. However, the code should be your own team’s, and should be the result of you exercising your own understanding of it. If you reference anyone else’s code in writing your project, you must properly cite it in your code (in comments) and your writeup. For the full honor code refer to the ENAE788M Fall 2019 website.