Trajectory Following on the PRG Husky
Table of Contents:
- 1. Deadline
- 2. PRGHusky Setup
- 3. Problem Statement
- 4. Trajectory 1: Helix
- 5. Trajectory 2: Diamond
- 6. Trajectory 3: Staircase
- 7. Submission Guidelines
- 8. Allowed and Disallowed functions
- 9. Collaboration Policy
1. Deadline
11:59PM, Thursday, October 03, 2019.
2. Problem Statement
Often times you want to follow known trajectories to accomplish various tasks such as obstacle avoidance, pursuit or cinematography. In a general aerial robot, you obtain a path from a path planner such as Dijkstra’s algorithm or A* or RRT and so on. These paths have to then be converted into feasible motion trajectories which take into account the dynamics of the system. Finally, once the feasible motion trajectory is obtained, one has to implement a controller to follow the trajectory on the PRG Husky.
3. PRGHusky Setup
Familiarize yourself with the PRGHusky platform by using bebop_autonomy package to control it. You might have to change the gains of the inner-loop PID and some sonar characteristics to get a more stable flight. Refer to the PRGHusky Wiki on details for updating parameters (gains and sonar params). Also, you can find more advanced information here: UBHG.
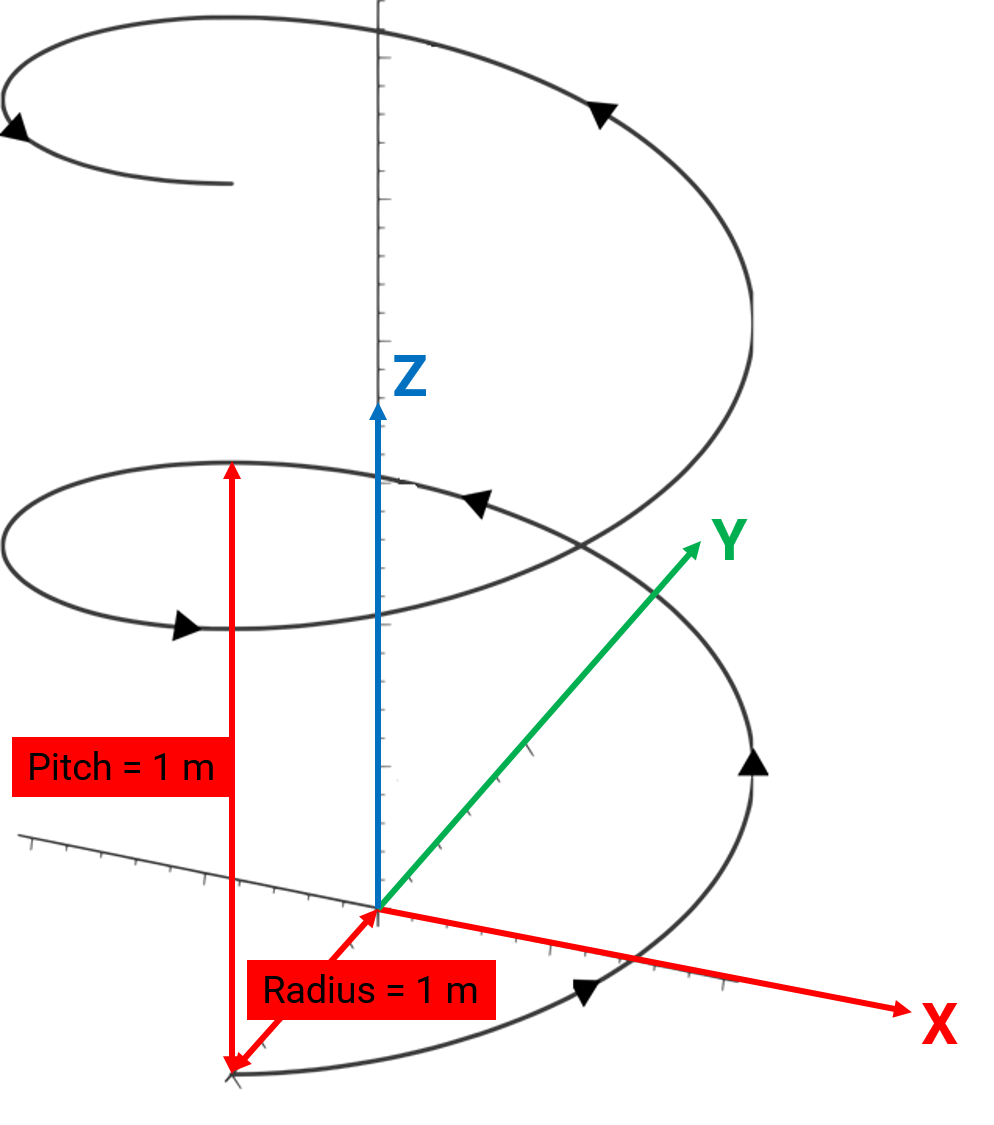
4. Trajectory 1: Helix
The first trajectory is a Helix with radius of 1 m and has a minimum of 1 turn with pitch of 1 m (Refer to Fig. 1).
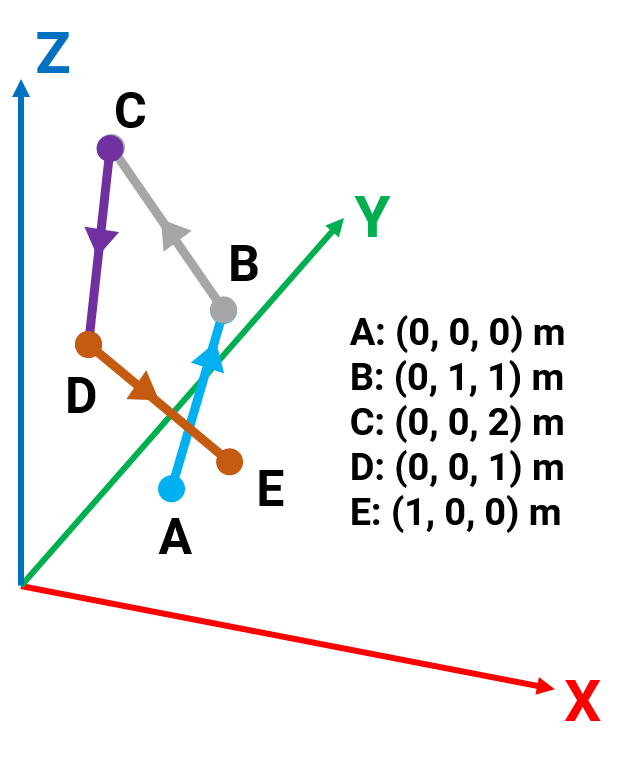
5. Trajectory 2: Diamond
The second trajectory is a Diamond (not a closed one) with it’s corner points shown in Fig. 2.
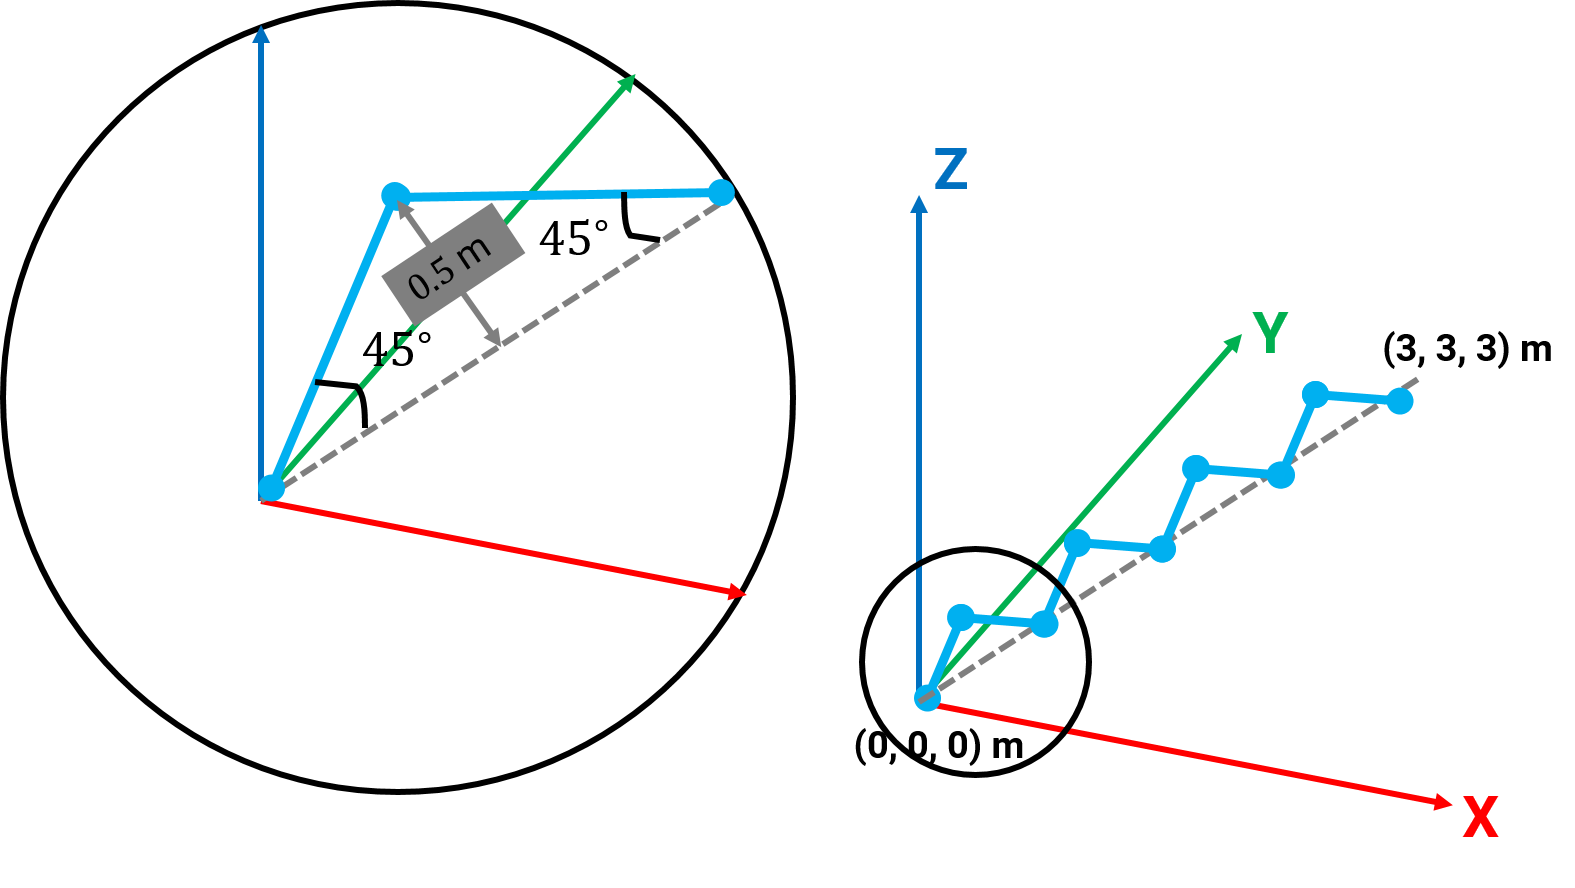
6. Trajectory 3: Staircase
The third trajectory is a Staircase modulated on a straight line which goes from (0,0,0) m to (3,3,3) m. More details about the trajectory are shown in Fig. 3.
7. Submission Guidelines
If your submission does not comply with the following guidelines, you’ll be given ZERO credit
7.1. Report
Explain in detail your approach to complete the project, and describe any interesting problems you encountered and/or solutions you implemented. You MUST include the following details in your writeup:
- Your report MUST be typeset in LaTeX in the IEEE Tran format provided to you in the
Draftfolder (Use the same draft folder from P1) and should of a conference quality paper. - Present Vicon plots for each trajectory followed with ideal trajectory overlaid in a different color with appropriate legends. (Show all three views
X-Y,X-ZandY-Z). - Present the output videos for trajectory following for each trajectory on the PRGHusky as
Outputs/Traj1.mp4,Outputs/Traj2.mp4andOutputs/Traj3.mp4.
7.2. File tree and naming
Your submission on ELMS/Canvas must be a zip file, following the naming convention TeamYourTeamNumber_p2.zip. If you email ID is 1, then the submission file should be named Team1_p2.zip. You can have any helper functions in sub-folders as you wish, be sure to index them using relative paths and if you have command line arguments for your Wrapper codes, make sure to have default values too. Please provide detailed instructions on how to run your code in README.md file. Please DO NOT include data in your submission.
TeamYourTeamNumber_p2.zip
│   README.md
|   Your Code files
|   ├── Any subfolders you want along with files
|   Outputs
|   ├── Traj1.mp4
|   ├── Traj2.mp4
|   └── Traj3.mp4
└── Report.pdf
8. Allowed and Disallowed functions
Allowed:
Any functions regarding reading, writing and displaying/plotting images in cv2, matplotlib, ROS.
- Basic math utilities including convolution operations in
numpyandmath. - Any functions for pretty plots.
bebop_autonomypackages for controlling the PRGHusky.
Disallowed:
- Any function that implements trajectory interpolation.
9. Collaboration Policy
You are encouraged to discuss the ideas with your peers. However, the code should be your own team’s, and should be the result of you exercising your own understanding of it. If you reference anyone else’s code in writing your project, you must properly cite it in your code (in comments) and your writeup. For the full honor code refer to the ENAE788M Fall 2019 website.
=======
layout: page mathjax: true title: Trajectory Following on the PRG Husky permalink: /2019/proj/p2/ —
Table of Contents:
- 1. Deadline
- 2. PRGHusky Setup
- 3. Problem Statement
- 4. Trajectory 1: Helix
- 5. Trajectory 2: Diamond
- 6. Trajectory 3: Staircase
- 7. Submission Guidelines
- 8. Live Demo
- 9. Lab Instructions
- 10. Allowed and Disallowed functions
- 11. Collaboration Policy
1. Deadline
11:59PM, Thursday, October 03, 2019 for the report and videos.
In class, Thursday, October 03, 2019 for the live demo.
2. Problem Statement
Often times you want to follow known trajectories to accomplish various tasks such as obstacle avoidance, pursuit or cinematography. In a general aerial robot, you obtain a path from a path planner such as Dijkstra’s algorithm or A* or RRT and so on. These paths have to then be converted into feasible motion trajectories which take into account the dynamics of the system. Finally, once the feasible motion trajectory is obtained, one has to implement a controller to follow the trajectory.
In your case, you are given trajectory specifications which need to be time parametrized, then a controller (outer loop) has to be written to follow the desired trajectory on the PRG Husky. You are required to write a node (not just a shell script) to time parametrize the given trajectory (feel free to have a different node for every different trajectory), compute the control commands and publish it to the required topic. You need to plot in real-time the current transform being executed in rviz. Refer to this rviz tf page for an example output. You are also required to write a launch file to launch all the nodes required along with the rviz visualization (you can save the rviz config to do this).
3. PRGHusky Setup
Familiarize yourself with the PRGHusky platform by using bebop_autonomy package to control it. You might have to change the gains of the inner-loop PID and some sonar characteristics to get a more stable flight. Refer to the PRGHusky Wiki on details for updating parameters (gains and sonar params). Also, you can find more advanced information here: UBHG.
4. Trajectory 1: Helix
The first trajectory is a Helix with radius of 1 m and has a minimum of 1 turn with pitch of 1 m (Refer to Fig. 1).
5. Trajectory 2: Diamond
The second trajectory is a Diamond (not a closed one) with it’s corner points shown in Fig. 2.
6. Trajectory 3: Staircase
The third trajectory is a Staircase modulated on a straight line which goes from (0,0,0) m to (3,3,3) m. More details about the trajectory are shown in Fig. 3.
7. Submission Guidelines
If your submission does not comply with the following guidelines, you’ll be given ZERO credit
7.1. Report
- A sample report can be found here.
Explain in detail your approach to complete the project, and describe any interesting problems you encountered and/or solutions you implemented. You MUST include the following details in your writeup:
- Your report MUST be typeset in LaTeX in the IEEE Tran format provided to you in the
Draftfolder (Use the same draft folder from P1) and should of a conference quality paper. - Present Vicon plots for each trajectory followed with ideal trajectory overlaid in a different color with appropriate legends. (Show all three views
X-Y,X-ZandY-Z). A reference Vicon plot is given in the bag file here. You can play the ROS Bag usingrosbag play -l rosbag_husky_vicon_rig.bag. You can read the node as/vicon/vicon_mount_husky. - Present the output videos for trajectory following for each trajectory on the PRGHusky as
Outputs/Traj1.mp4,Outputs/Traj2.mp4andOutputs/Traj3.mp4.
7.2. File tree and naming
Your submission on ELMS/Canvas must be a zip file, following the naming convention TeamYourTeamNumber_p2.zip. If you email ID is 1, then the submission file should be named Team1_p2.zip. You can have any helper functions in sub-folders as you wish, be sure to index them using relative paths and if you have command line arguments for your Wrapper codes, make sure to have default values too. Please provide detailed instructions on how to run your code in README.md file. Please DO NOT include data in your submission.
TeamYourTeamNumber_p2.zip
│   README.md
|   Your Code files
|   ├── Any subfolders you want along with files
|   Outputs
|   ├── Traj1.mp4
|   ├── Traj2.mp4
|   └── Traj3.mp4
└── Report.pdf
8. Live Demo
On Thursday, October 03, 2019, the class will be held in the lab from 3 p.m. where each team will show a live demo of all the three trajectories in action. Each time will be given 15 minutes to setup and demo all the three trajectories.
9. Lab Instructions
Make sure all of your batteries are FULLY CHARGED before coming to the lab session.
9.1 Up board
You are expected to run these two code snippets (and show the outputs to the instructors):
# For Testing Ubuntu Version in Up-Board
lsb_release -a
wget https://docs.opencv.org/3.3.0/opencv_screenshot.jpg
# For Testing OpenCV and Numpy Version in Up-Board and run a sample output
import numpy as np
import cv2
print('Numpy version:', np.__version__)
print('OpenCV version:', cv2.__version__)
# Load an color image in grayscale
img = cv2.imread('opencv_screenshot.jpg',0)
cv2.imshow('image',img)
cv2.waitKey(0)
cv2.destroyAllWindows()
To run these, you will provided a monitor with HDMI, Mouse and a Keyboard. You will power your Up board using Husky’s power ONLY. Also, if you don’t have internet access in the Up board, you won’t be able to run the above wget command; so please download this image and copy the image to the Up board to some specific location from where you will be running the script in-class. Make sure the file name remains opencv_screenshot.jpg.
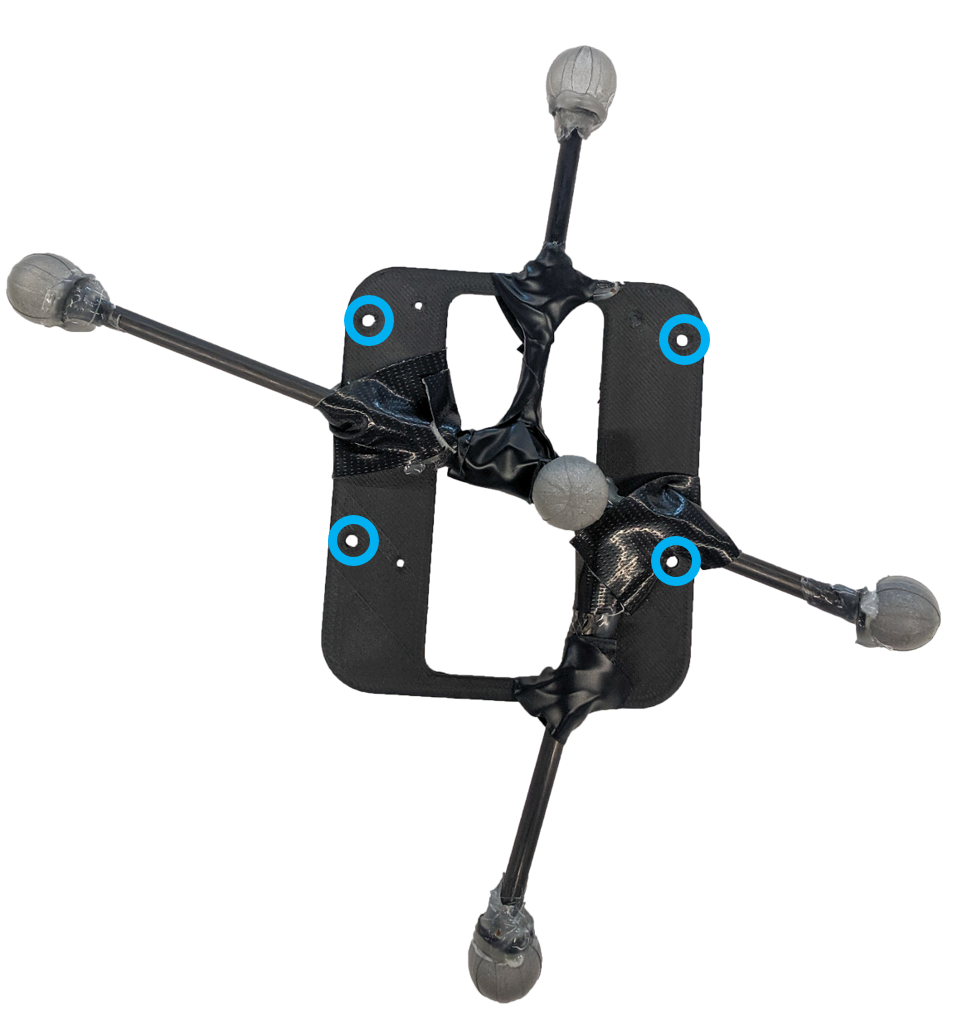
9.2 Vicon Setup
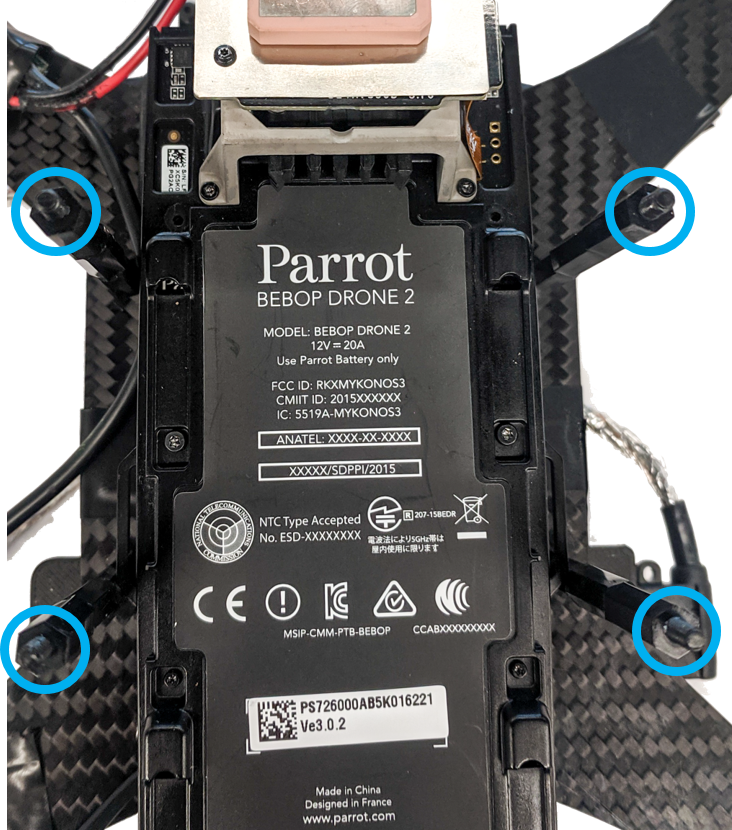
You will be provided with a shield with vicon markers (shown below) that you will replace with your Up board. You are going to unscrew (M3 nuts) the Up board from the PRG Husky platform and screw-in the vicon marker shield.
The first thing you need to do is to connect your laptop/linux machine (not Up board) is to connect to ARC lab WiFi. The SSID of the network will be Drone_Lab. The password will be provided during the lab session! Make sure you have a secure connection to this WiFi (and not eduroam or anything else as the Vicon runs on this network).
Before running the experiment, make sure you bag the vicon outputs which will be published at 100Hz. In your ~/.bashrc file, you MUST add the following snippet at the last of your file:
export ROS_MASTER_URI=http://192.168.1.251
export ROS_IP=<"YOUR_IP">
The ROS Master will be running on the Vicon PC. To get your ROS_IP (your laptop IP), do ifconfig on your system and check for your wireless inet addr.
To record the rosbag on your laptop, simply run
rosbag record -O rosbag_husky_vicon_rig /vicon/vicon_mount_husky
We HIGHLY recommend to play the rosbag everytime you finish your run/experiment. You can run your rosbag using:
rosbag play -l rosbag_husky_vicon_rig.bag
-l flag is to run the bag in an infinite loop.
A sample Vicon recording is given in the bag file here. You can read the node as /vicon/vicon_mount_husky.
Or you can also record the .csv file from Vicon directly. The instructors will record this for you in Project 2. You need to inform the instructors when to start and end the recording sequence. A sample ‘.csv’ file is given here.
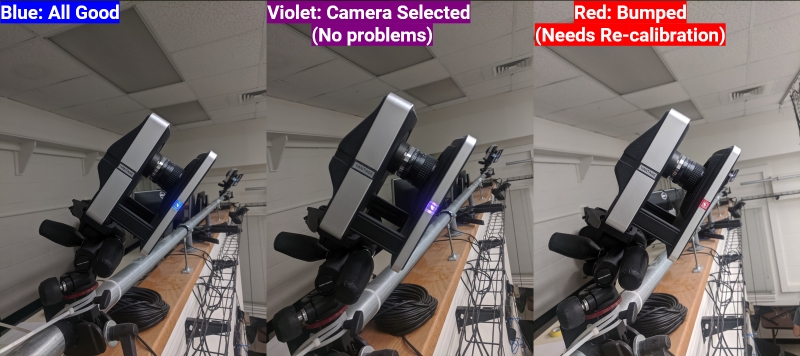
Another thing to note is the calibration. Vicons will be well calibrated before but a little physical nudge to the Vicon or the even the wall might change the orientation/position of the Vicon cameras. In which case, the LEDs on the Vicon cameras will change from Blue to Red (as shown in the figure below) and we would need to recalibrate them again. It is the team’s responsibility to notice the calibration and inform the instructors.
Also, record a video of the quadrotor during the experiments and upload them with your submissions in the Output/ folder as mentioned in the section 7.1.
Furthermore, you need to follow the instruction and safety manual for the lab. It is the same one you had signed before. If you do not comply with the instructions, we would be forced to disqualify the team. You can find a copy of the manual here.
Finally, YOU WILL BE GIVEN a TOTAL of 15 mins for the lab session. So, please prepare before and use your lab time wisely. We recommend sparing at least 8-10 mins for the Trajectory experiment. Try to finish everything else under 5 mins. Parallelize the work load between the team members. You can run the experiments for any number of trials. Upload the best run in your report. You can discard all other experimetns if you want. They will not be graded
GOOD LUCK!!!
10. Allowed and Disallowed functions
Allowed:
Any functions regarding reading, writing and displaying/plotting images in cv2, matplotlib, ROS.
- Basic math utilities including convolution operations in
numpyandmath. - Any functions for pretty plots.
bebop_autonomypackages for controlling the PRGHusky.
Disallowed:
- Any function that implements trajectory interpolation.
11. Collaboration Policy
You are encouraged to discuss the ideas with your peers. However, the code should be your own team’s, and should be the result of you exercising your own understanding of it. If you reference anyone else’s code in writing your project, you must properly cite it in your code (in comments) and your writeup. For the full honor code refer to the ENAE788M Fall 2019 website.
9f08380f2d3b9e99fe3bdf0dc4a60254760c12b5