Mini Drone Race
Table of Contents:
- 1. Deadline
- 2. Problem Statement
- 3. Testing
- 4. Submission Guidelines
- 5. Debugging Tips
- 5. Allowed and Disallowed functions
- 6. Collaboration Policy
1. Deadline
11:59PM, Thursday, October 17, 2019 for submission of the report and video.
2. Problem Statement
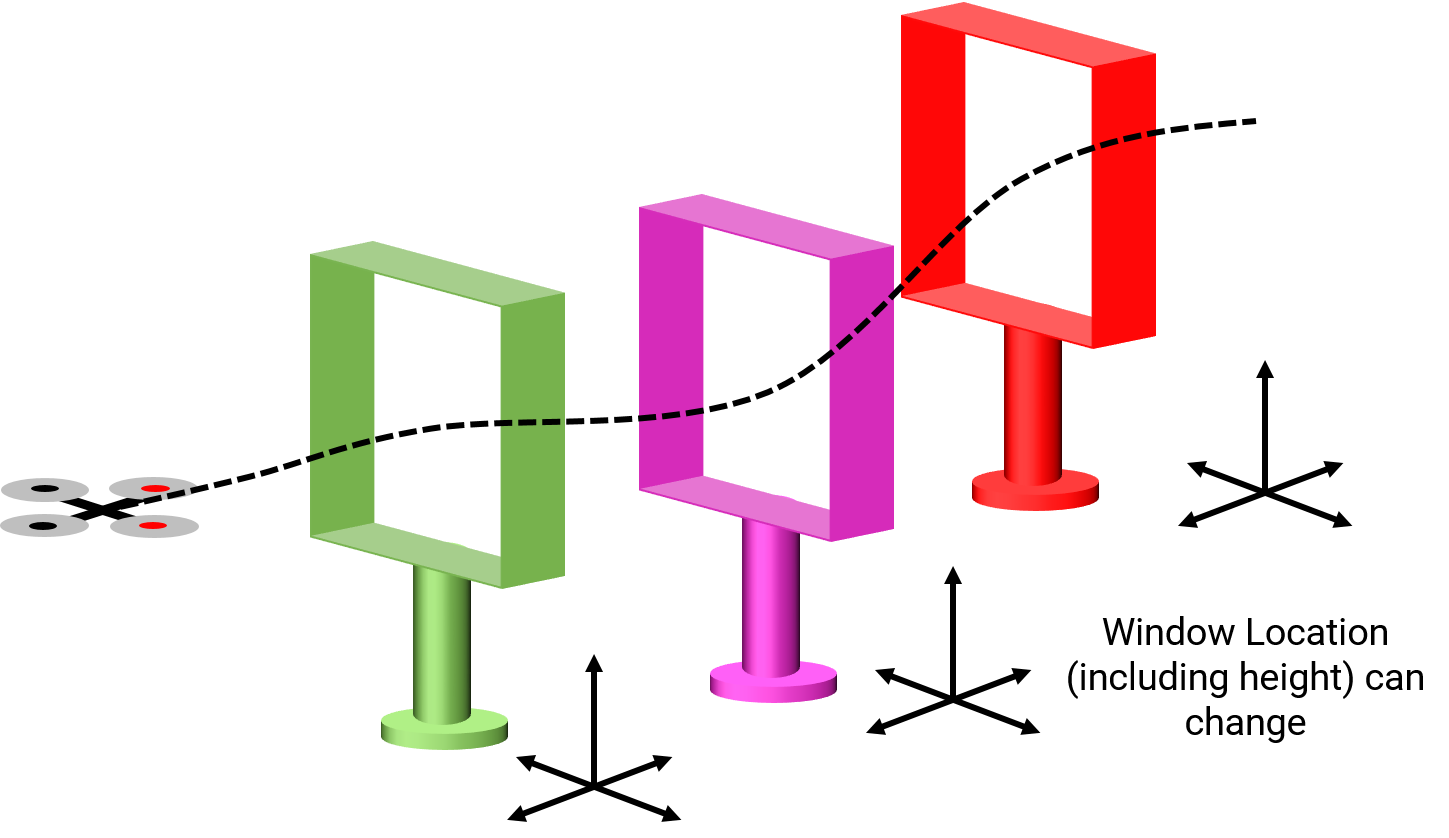
In this project, your aim is to navigate through colored window sequence of known sizes but unknown position and orientation. The windows are setup in the lab IRB 0108. You need to collect data as a ROS bag/video capture while moving the monocular camera pointed at different angles (possible different illumination) of the window. Feel free to place the windows at any distance and orientation you desire for your testing. You’ll need to implement the detection algorithm of windows using color or edges or whatever you desire. Note that you’ll have to calibrate the camera to estimate the value of the camera matrix . Also, you’ll need to rectify the images before processing them. Once you’ve estimated the window pose in 3D, implement a trajectory planner and control algorithm to go through the window.
3. Testing
On the day of the deadline, each team will be given a 15 minute slot for demoing their code in action to the instructors. The instructors will place the windows as they wish (position, orientation and order of color). The task is the fly through the windows as fast as possible.
4. Submission Guidelines
If your submission does not comply with the following guidelines, you’ll be given ZERO credit
4.1. Report
Explain in detail your approach to complete the project, and describe any interesting problems you encountered and/or solutions you implemented. You MUST include the following details in your writeup:
- Your report MUST be typeset in LaTeX in the IEEE Tran format provided to you in the
Draftfolder (Use the same draft folder from P1) and should of a conference quality paper. - Present Vicon plots for each trajectory followed along with the estimated 3D window position overlaid on the same plot. (Show all three views
X-Y,X-ZandY-Z). - Present the output videos for trajectory following along with the window estimates in real-time as
Outputs/GapFlyt.mp4. Be sure to use appropriate colors to plot the windows inrviz, for eg., blue color for a blue window and so on.
4.2. File tree and naming
Your submission on ELMS/Canvas must be a zip file, following the naming convention TeamYourTeamNumber_p3a.zip. If you email ID is 1, then the submission file should be named Team1_p3a.zip. You can have any helper functions in sub-folders as you wish, be sure to index them using relative paths and if you have command line arguments for your Wrapper codes, make sure to have default values too. Please provide detailed instructions on how to run your code in README.md file. Please DO NOT include data in your submission.
TeamYourTeamNumber_p3a.zip
│   README.md
|   Your Code files
|   ├── Any subfolders you want along with files
|   Outputs
|   └──  GapFlyt.mp4
└── Report.pdf
5. Debugging Tips
- To verify if your detections are working correctly, plot the corners of the window on the image, they should align with the true window corners.
- To verify if your pose estimation is correct, re-project the estimated 3D corners of the window onto the image. They should be very close to the detected corners.
5. Allowed and Disallowed functions
Allowed:
Any functions regarding reading, writing and displaying/plotting images and windows in cv2, matplotlib, ROS.
- Basic math utilities including convolution operations in
numpyandmath. - Any functions for pretty plots.
bebop_autonomypackages for controlling the PRGHusky.- Functions for color thresholding including GMM.
- Functions for line fitting and corner detection.
Disallowed:
- Any function that implements trajectory interpolation.
- Any function that directly detects the window.
6. Collaboration Policy
You are encouraged to discuss the ideas with your peers. However, the code should be your own team’s, and should be the result of you exercising your own understanding of it. If you reference anyone else’s code in writing your project, you must properly cite it in your code (in comments) and your writeup. For the full honor code refer to the ENAE788M Fall 2019 website. ======= — layout: page mathjax: true title: Mini Drone Race permalink: /2019/proj/p3a/ —
Table of Contents:
- 1. Deadline
- 2. Problem Statement
- 3. Window Statistics
- 4. Implementation
- 5. Test Set
- 6. Live Demo
- 7. Submission Guidelines
- 8. Debugging Tips
- 9. Allowed and Disallowed functions
- 10. Hardware Tips
- 11. Collaboration Policy
1. Deadline
11:59PM, Thursday, October 17, 2019 for submission of the report and video.
2. Problem Statement
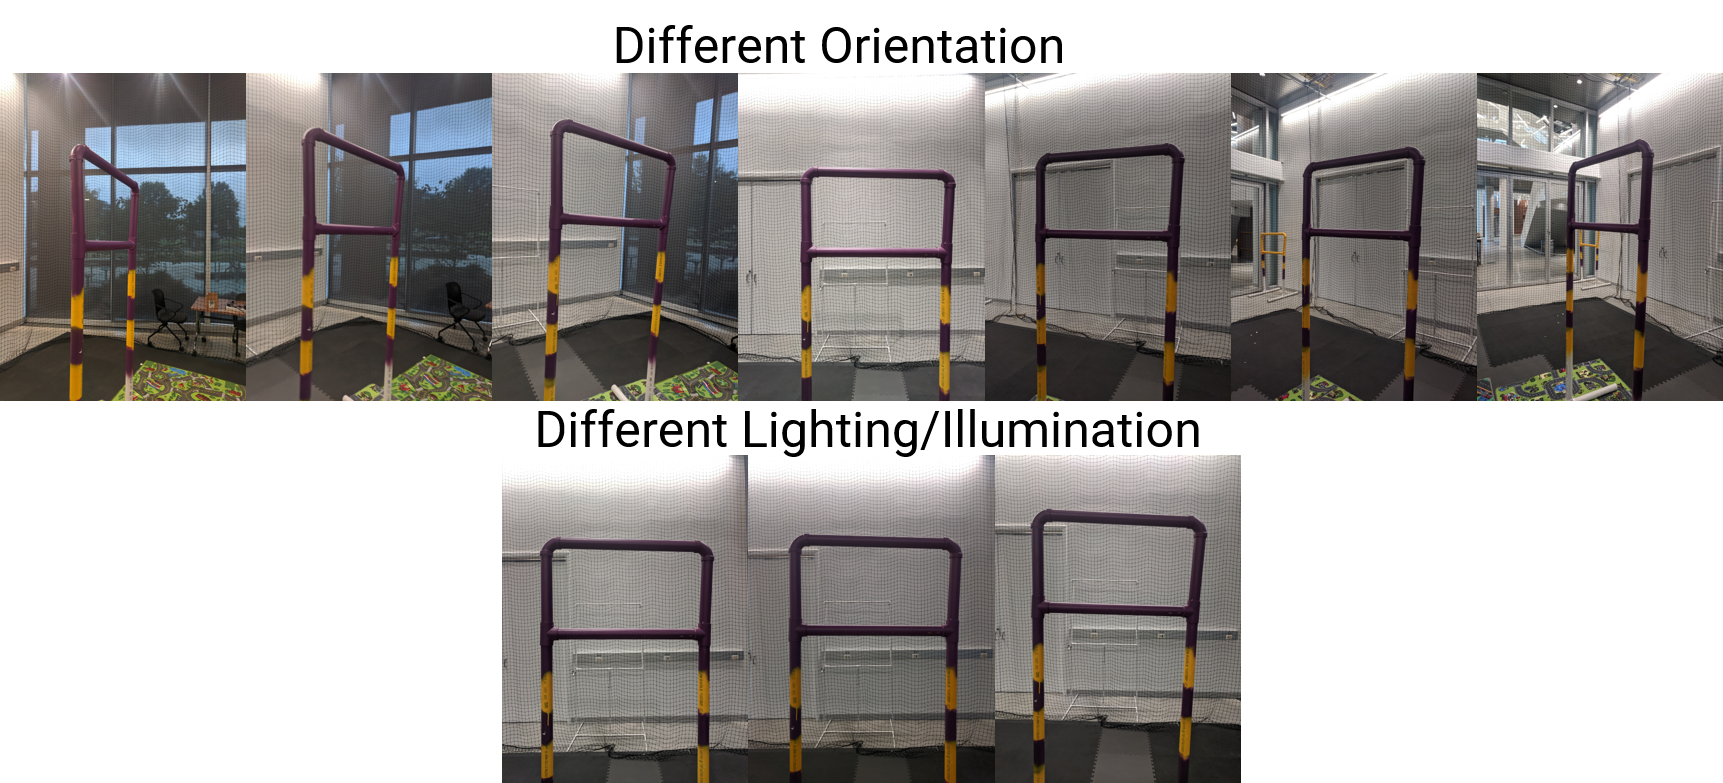
In this project, your aim is to navigate through a colored window (Fig. 1) of known size but unknown position and orientation. Windows of two different colors (yellow and purple) are setup in the lab IRB 0108. You need to collect data as a ROS bag/video capture while moving the monocular camera pointed at different angles and different illumination of the window (sample images are shown in Fig. 2). Feel free to place the windows at any distance and orientation you desire for your testing. You’ll need to implement the detection algorithm of windows using color or edges or whatever you desire. Note that you’ll have to calibrate the camera to estimate the value of the camera matrix . Also, you’ll need to rectify the images before processing them. Once you’ve estimated the window pose in 3D, implement a trajectory planner and control algorithm to go through the window.
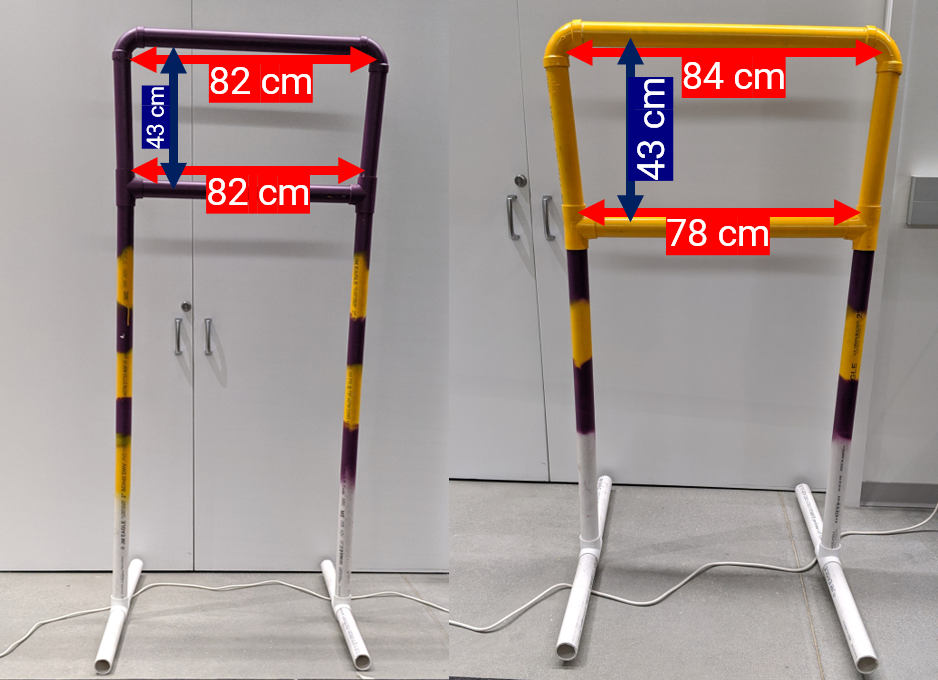
3. Window Statistics
The window measures (length and breadth) are shown in the figure 3. Note that the height of the windows are unknown. Also, the windows may or may not be exactly rectangular as shown in the figure 3. The windows are made of white PVC pipes of diamemer 6.2 cm and are spray pained in yellow and or violet.
4. Implementation
The instructors will place the quadrotor and the window at a certain orientation and position, making sure that the part of the window is visible in the first frame on take off. Your job is to detect the window and go through. There will be ONLY one window and that can be of either yellow or purple (you will informed only a minute before flying) and of some arbitrary height. You need to implement the following:
4.1. ROS Nodes
You need to create multiple ROS nodes to run your algorithm: one for vision, another for the control or one which does both. You can have any number of nodes as you desire.
4.2. Launch File
All the above ROS nodes must be called using a single launch file.
4.3. Rviz visualization
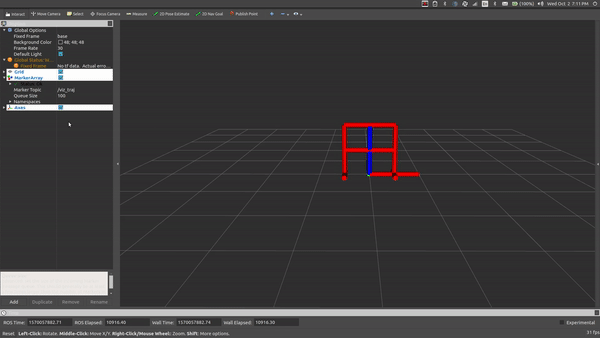
You need to plot the window in rviz along with the trajectory (and pose i.e. both position and orientation) of your quadrotor. The rviz visualization must show the correct color: either purple or yellow. A sample visualization is shown in Fig. 4. Be sure to fix your window in some arbitrarily chosen world frame and plot your camera’s (quadrotor’s) pose with respect to it.
4.4. Color Segmentation
4.4.1. Color Segmentation Using Thresholding
Implement color thresholding without using any built-in or third party code for color thresholding. Include your outputs (as a video) for the Test set. Feel free to use any color space you desire, you can use built-in or third party code for color conversions.
4.4.2. Color Segmentation Using Single Gaussian
Implement color thresholding without using any built-in or third party code for color segmentation using a single gaussian. Include your outputs (as a video) for the Test set. Feel free to use any color space you desire, you can use built-in or third party code for color conversions and dataset labelling.
4.4.3. Color Segmentation Using a Gaussian Mixture Model (GMM)
Implement color thresholding without using any built-in or third party code for color segmentation using a GMM (use more than 1 gaussian). Include your outputs (as a video) for the Test set. Feel free to use any color space you desire, you can use built-in or third party code for color conversions and dataset labelling.
4.4.4. Line/Shape Fitting
Implement an algorithm to fit lines to the detected color using any built-in or third party code.
4.4.5. Final Filtering
Use any built-in and third party morphoplogical operation for this.
Be sure to cite any third party code you use.
4.5. Camera Intrinsic and Color Calibration
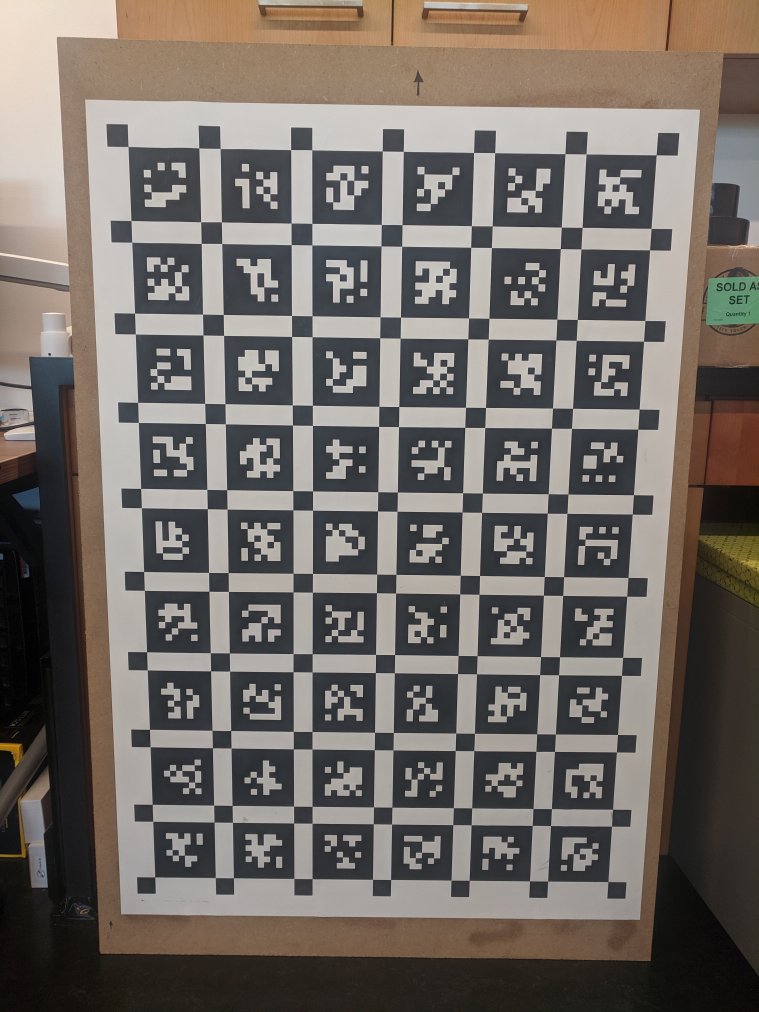
Camera Intrinsic calibration entails with estimating the camera calibration matrix which includes the focal length and the principal point and the distortion parameters. You’ll need to use the awesome calibration package developed by ETHZ Kalibr to do this. You’ll need either a checkerboard or an april grid to calibrate the camera. We found that using the April grid gave us superior results. Feel free to print one (don’t forget to turn off autoscaling or scaling of any sort before printing). Bigger april grids or checkerboard in general give more accurate results. A large april grid is located in IRB 3237 (Fig. 4) which you are free to use if you don’t want to print your own.
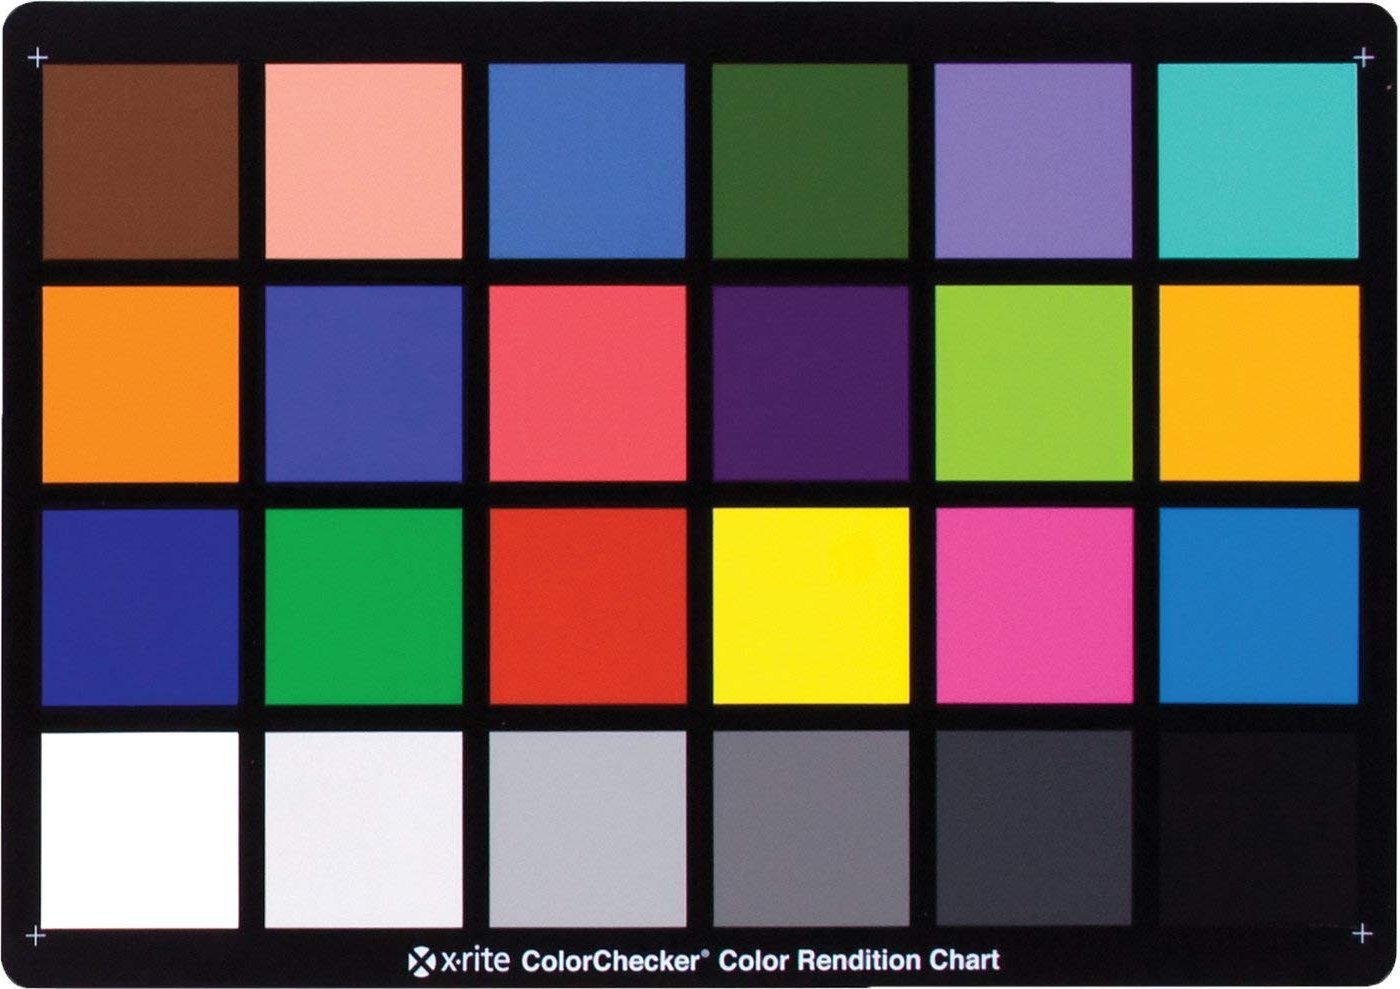
A simple way to color calibrate a camera is to use a color calibration grid as shown in Fig. 6. It has different standard colors which you’ll match up visually. Another simple way is to capture a scene with “gray” color and make sure that it looks gray. Note that your results will vary based on your monitor’s color calibration as well. Color calibration is important so that the complete dynamic range of all channels are used when converting from bayer to RGB image.
4.6. Camera/Window Pose
Once the four or eight corners of the window have been detected, you’ll need to recover the camera pose with respect to the window. Here we assume that the window is fixed and the camera is moving, hence the window is in some known co-ordinates in an arbitrarily chosen world frame. The choice of the world frame could be as simple as one of the window corners as origin. Use the function cv2.solvePnP to estimate camera pose given corresponding image co-ordinates of the corners and world points, matrix and distrotion coefficients.
5. Test Set
A test set will be released 24 hours before the deadline. The test set will either be in the form of a ROS bag or a mp4 video showing one of the colored windows from different orientation, position and illumination. You have to output the detected corners of the window overlayed on each frame and export this to an mp4 video which you need to include in your report. You also need to display the pose the camera with respect to the window as numbers overlayed on the same video (please define your coordinate axes and origin in your report so we can make sense of your numbers).
6. Live Demo
On the day of the deadline, each team will be given a 15 minute slot for demonstrating their code in action to the instructors. The instructors will place the windows as well as the PRG Husky quadrotor as they wish (position, orientation and choice of colored window at different heights). The instructors will make sure that atleast a part of the window is in the visible region as seen from the first frame (note that it is not guarenteed that the complete window will be visible in the first frame). The task is the fly through the windows as fast as possible. You also need to show us a live visualization of your detection (corners of the window overlaid on the image) along with the 3D visualization of the window with the relative camera pose overlaid in rviz.
7. Submission Guidelines
If your submission does not comply with the following guidelines, you’ll be given ZERO credit
7.1. Report
Explain in detail your approach to complete the project, and describe any interesting problems you encountered and/or solutions you implemented. You MUST include the following details in your writeup:
- Your report MUST be typeset in LaTeX in the IEEE Tran format provided to you in the
Draftfolder (Use the same draft folder from P1) and should of a conference quality paper. - Present the output videos for trajectory following along with the window corner detections overlaid on the video, rviz visualization of 3D window pose estimates in real-time as
Outputs/GapFlyt.mp4. Be sure to use appropriate colors to plot the windows inrviz, for eg., yellow color for a yellow window and violet color for violet window.
A sample report for a related project can be found here. Treat this report as the benchmark or gold standard which we’ll compare your reports to for grading.
7.2. File tree and naming
Your submission on ELMS/Canvas must be a zip file, following the naming convention TeamYourTeamNumber_p3a.zip. If you email ID is 1, then the submission file should be named Team1_p3a.zip. You can have any helper functions in sub-folders as you wish, be sure to index them using relative paths and if you have command line arguments for your Wrapper codes, make sure to have default values too. Please provide detailed instructions on how to run your code in README.md file. Please DO NOT include data in your submission.
TeamYourTeamNumber_p3a.zip
│   README.md
|   Your Code files
|   ├── Any subfolders you want along with files
|   Outputs
|	├──  TestSetOutput.mp4
|   └──  GapFlyt.mp4
└── Report.pdf
8. Debugging Tips
- To verify if your detections are working correctly, plot the corners of the window on the image, they should align with the true window corners.
- To verify if your pose estimation is correct, re-project the estimated 3D corners of the window onto the image. They should be very close to the detected corners.
9. Allowed and Disallowed functions
Allowed:
Any functions regarding reading, writing and displaying/plotting images and windows in cv2, matplotlib, ROS.
- Basic math utilities including convolution operations in
numpyandmath. - Any functions for pretty plots.
bebop_autonomypackages for controlling the PRGHusky.- Morphological operations.
- Linear and non-linear least squares.
- Functions for corner detection and tracking.
- Functions for sensor fusion including Kalman Filters.
cv2.solvePnPfor estimating camera pose given image-world point correspondences.- Functions for line fitting including hough transform and
cv2.fitLine.
Disallowed:
- Any function that implements trajectory interpolation.
- Any function that directly detects the window.
- Functions for color thresholding including GMM.
10. Hardware Tips
10.1 WiFi Driver
You will be using EDUP DB1607 WiFi module with Intel Up board. You can clone the rt8812au driver repo. Do
git clone https://github.com/chahatdeep/rtl8812au-wifi-driver
And follow the README.md instructions from the above repo.
Once you install this driver, you would need to restart your Up board and everything should work!
In case it doesn’t work, there is a chance you have to reinstall the Ubuntu that you currently have (depending if your tried installing some random drivers on your own).
10.2 Leopard Imaging M021 Camera
To download and run the leopard imaging camera driver on your Up board, please use the following link:
https://github.com/chahatdeep/ubuntu-for-robotics/tree/master/Drivers/Leopard-Imaging-Camera
You will be using the Linux driver. There is a windows driver available as well. You can use that to quickly visualize and maybe tune the gains easily. We officially support python and python3 code which you can find in m021v4l2/opencv. There is C++ code available as well. In python and python3 folder, you can run the python code by running run-capture.py or run the ros node directly by running ros-capture.py.
The driver has been tested in Up board. So, the driver has a little issue. It by default tries to read /dev/video0 which could your webcam in case of your laptop. So directly try to use the driver on the Up board itself and do not plug any other video device.
10.3 Calibrating RGB Channels in Leopard Driver
Edit the __init__.py file. You can find the file in the python/m021v4l2 folder. Depending on which resolution class you’re calling in your run-capture.py file, you can alter the bcorrect, gcorrect, rcorrect variables.
11. Collaboration Policy
You are encouraged to discuss the ideas with your peers. However, the code should be your own team’s, and should be the result of you exercising your own understanding of it. If you reference anyone else’s code in writing your project, you must properly cite it in your code (in comments) and your writeup. For the full honor code refer to the ENAE788M Fall 2019 website.
9f08380f2d3b9e99fe3bdf0dc4a60254760c12b5